
When I was a kid, I remember my family getting corsages or flowers for my grandmothers to wear on Mother’s Day. To this day I always stop and get my mom flowers but I thought that maybe this year I would do something a little different. Since I am obsessed with making flowers, why not make my mom a flower corsage? So after some research I found instructions on how to make ribbon leaves, so I took those instructions and built on them turning those leaves into this lovely flower.
Supplies:
Scissors
Glue Gun
Felt
Needle
Thread
Pin back
1/8” of a Yard of 45” wide Fabric (I used 2 different fabrics, satin and organza)
Large button center or old jewelry
Pin back
Ruler
Compass
- Cut two circles out of the felt. One 2.25” and the other 2.5” round.

- Cut 15-3”x3” squares out of the fabric.

- Thread your needle and knot off. Take one of the squares and fold it in half length wise with the good side of the fabric facing outward. Hold in place with your fingers.

- Take the upper right corner and fold it down towards the center of the fabric. Holding the folded corner in place, repeat with the other corner.

- Take the needle and run a gathering stitch along the open bottom edge of the fabric. Gather the fabric together and knot it off. Repeat steps four and five with the remaining 14 squares of fabric.

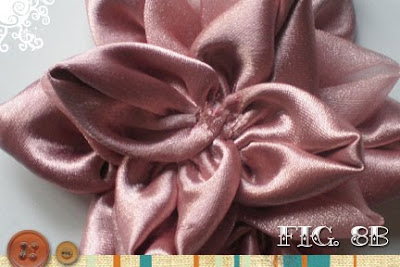
- Now that all the petals are done you can start to sew them to the base. Using the smaller 2.25” circle, take one of the petals with folds facing up and stitch about a quarter of an inch away from the outer edge, see fig. 6a. Repeat this step with four more petals until the outer edge is filled with petals, see fig. 6b.


- Moving to about .75” from the edge, start your second row of five petals. Note: This is the row I used a different fabric. Don’t be afraid to mix it up a bit.


- The last set of petals are not quite a row but more of a pile up. Start by sewing one petal to the center of the flower. For the next petal you will stagger the position but will sew threw the original petal and into the center of the flower as well. Repeat this until the remaining petals are attached. The center will consist of four petals.

- To finish the center of the flower you can use a fancy button or recycle and old piece of jewelry. If you use a button I would suggest sewing it to the center. However, if you use an old piece of jewelry (or earring like me) you can just use hot glue to attach it to the center.

- So the flower is finished but what about the back? Put the flower aside for a moment and grab the 2.5” round felt and the pin back. Glue the pin to the center of the felt using hot glue (don’t worry we are going to cover up that oozy messy glue in the next step).

- Take a piece of felt or left over fabric and cut it into the shape of a small heart. (I usually just eye ball something but you can make a paper pattern if it is easier for you.) Glue this heart over the pin to cover up the glue gump, see fig. 11. Then glue your backer to the back side of the flower.


Just found your blog through totally tutorials.. and I love your flower tutorials!! Definitely going to be trying out some of your flowers!!! Thanks for sharing!
ReplyDeleteThe corsage looks lovely. I definitely want to try this.
ReplyDeleteHi Kolleen,
ReplyDeleteI just wanted to let you know that I featured your tutorial on my site, www.AllFreeBeadedJewelry.com. I linked to this project:
http://www.allfreebeadedjewelry.com/Brooches-and-Pins/Beaded-Satin-Flower-Brooch
I would like to know if I can link like this to you, including a photo, in the future. Or if you would be willing to allow me to post projects in full on the site - full credit will always be given to you, of course. Your projects have the opportunity to be featured in our newsletter as well. It would be yet another source of traffic to your blog.
Once I have two projects on the site I can start a designer profile for you with links back to your blog, store, facebook, etc. Here is an example of one: http://www.allfreebeadedjewelry.com/Jewelry-Designers/Pearl-Blay-Jewelry-Designer
Please let me know, I would love to work with you further.
Thanks!
Maggie Kmiecik
mkmiecik@primecp.com
lovely flower I found you thru the link AllFreeBeadedJewelry as above, now following your blog from Chris in oz Australia
ReplyDeleteThat came out very pretty, like it alot!!! Thanks for sharing!!!
ReplyDeletewhere can i purchase the materials you use in your projects? very important information for me.
ReplyDeletegodclimax@yahoo.com
I purchased the fabric from Joann's fabric store. The pin back from a craft store named Micheals and the old earring from Ebay
ReplyDeleteNice brooch... I'll try to make it later...
ReplyDeleteThanks for sharing so simply explained.
ReplyDeleteBridal jewelry sets are worn to match each outfit. Brides look resplendent in their Indian bridal wear though all the pet houses jewelry worn is not necessarily pure gold.
ReplyDeleteI so found this really easy to understand unlike some other tutorials I have read. I really like how you explained everything in exact detail. Thank you so much for sharing. BTW I found this on http://www.allfreejewelrymaking.com/
ReplyDeleteWao!!! I am so inspired, I gonna try it right now
ReplyDeleteI love the flower. Tutorial very explanatory. Thumb up, sis.
ReplyDelete"Great insights! Thanks for sharing."
ReplyDeletebatch tricolor