
I can't open a magazine or visit a fashion website without seeing some kind of feather accessory. Yes, I do make feather hair clips but I thought it would be fun to try my hand at making some jewelry. So after a little craft exploration I came up with an idea for a necklace out of feathers and an old plain chain necklace.
Supplies:
5 peacock eye feathers
Scissors
Paper
Pencil
Glue Gun
Stiff Felt (the kind you buy by the square)
Needle
Thread that matches felt
Old chain necklace (if you don’t have an old chain necklace you can purchase new chain and findings in most craft stores)
- Take three of your peacock feathers and trim the wispy eyelash like ends off of the rounded top and cut off the stem just below the “eye” (see fig. 1).

- Arrange the feathers similar to fig. 2a on top of the piece of paper. Carefully trace around the feathers. When you remove the feathers place them to the side in the exact order you had them on your paper pattern.


- Take the pencil and draw a line inside the current outline that follows the shape of the original outline. Your new “inside” pattern should be about an eighth of an inch (give or take) from the original “outside” line. Cut out the “inside” pattern shape.

- Use the cut out paper pattern to cut out the felt backing. Place feathers on top of the felt to make sure that you can’t see any of the felt when the feathers are in position. Trim the felt if necessary.

- Take the chain and place the middle center aligned with the top center of the felt (see fig.5a). Sew the chain in place. Next take the chain and move one side to the left top corner and sew in place, repeat with right side (fig. 5b).


- With your trimmed feathers close by, take the glue gun and put a thin layer on the left side.* When the area is covered pick up the left hand side feather and carefully place it on the glued area. If the placement is not perfect DO NOT WORRY, that is why we have the other two feathers that we haven’t touched yet sitting on the side.
*NOTE: It is very important that the glue does not have any thick beads, to help avoid this make sure your glue gun is very hot and take the tip and place it right up against the felt and move it around the area.
- Repeat step 6 with the right and center feathers.
NOTE: Because hot glue is unforgiving and you can’t move the feathers around after they have touched the glue, you might notice small gaps where you can see the felt. Do not worry the next steps will cover these little gaps.

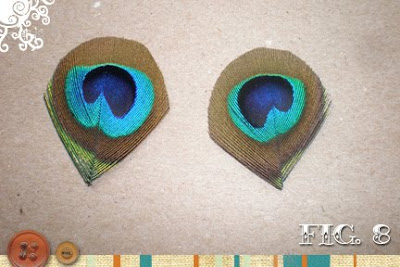
- Trim the two remaining feathers similar to the others, except you will be cropping closer to the eye, see fig. 8 for a reference.
- On the back side of the trimmed feathers, put a bead of glue along the stem (fig. 9a) then place the cropped feathers over the felt to cover the gaps (fig. 9b)


How unique and creative ! I'm thinking it can make a beautiful altered evening bag too. Thanks for the inspiration
ReplyDeleteHi,
ReplyDeleteThe peacock necklace is so nice, this exotic strand of natural-color Tahitian pearls features a multicolor array of silver pearls with various pink and cherry hues, as well as several dark peacock pearls. Thanks...
Peacock Necklace
I like it very much!!
ReplyDeleteThe problem is finding these bautiful feathers! :)
Cecilia
very smart :)
ReplyDeletethanks for instructions!!!
This is a great tutorial, thanks for sharing! (found you via Totally Tutorials)
ReplyDeleteLove this!! So Cute I'm going to try this soon!
ReplyDeleteLove this beautiful necklace... Very unique and very creative! Thanks for posting.
ReplyDeletehttp://glasspoppies.etsy.com
http://glasspoppies.blogspot.com
Ooooo I love it!!! Fantastic, I like I will try it but with polymer clay!!! I love you Etsy shop too!!
ReplyDeleteoops, I meant I THINK I will try it....
ReplyDelete