
Cotton Fabric Heaband


Supplies
Scissors
Needle & Thread (coordinate with fabric)
3 - Cover Button Size 36 (7/8 inch) wire back
Wide Headband
18" x 24" piece of fabric
Glue Gun

Note: I used different patterns for each flower and mixed things up so if you want to do this here is the fabric breakdown:
Each button: 2" x 2"
Larger flower: 3" x 18"
Smaller flower: 2" x 18"
Heaband: depends on size or your headband but you will need about 4" x 18" piece of fabric

  1. Cut two strips of 2" x 18" fabric for the smaller flowers. Cut one 3" x 18" strip for the larger flower.
  2. Take one of the strips and fold the fabric in half width wise and sew a gathering stitch along the unfinished bottom of the strip.

  3. Gather the strip of fabric and tie the end but do not cut the thread. Form a circle with material and stay stitch it in place.

  4. Repeat steps 2 & 3 with the remaining strips of fabric.
  5. Cover your buttons with fabric, for instructions refer to the Fabric Button Hair Band Tutorial.

  6. Sew your buttons to the circular flower bases.

  7. Cut a strip of fabric that is about a half an inch wider than your headband and a few inches long. Hot glue the half of the fabric to the backside of the headband (see fig. 7A). Now fold over the side ends to the front and glue them in place (see fig. 7B). Take the other half with sides folded in and glue to cover the end in fabric, much like wrapping a present (see fig. 7C). Repeat with the other end of the headband.

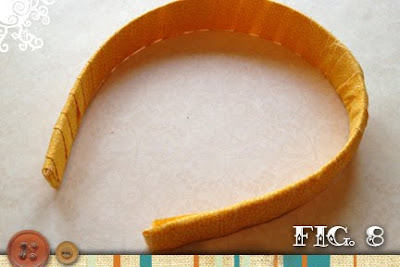
  8. Cut a strip of fabric that is about .5" to .75" by around 18" long. Starting at one end of the headband, glue the end of the fabric strip to the inside of the headband (fig. 8A). Start to wrap the fabric around the headband, gluing it in place every now and then (fig. 8B). Depending on the size or your headband and how you wrap you might have to repeat this step multiple times starting a new piece of fabric where your last piece ended (make sure so have a small overlap). Keep in mind that this doesn't have to be perfect!

  9. Figure out where on the headband you want to place your flowers and glue them to the headband. To make sure they were extra secure I cut circles slightly smaller than the flowers and glued them to the back side of the headband, making sure to sandwich the headband between the flower backs and the circle backers.

Comments

Popular posts from this blog

Leather Earring Tutorial

Why should leather only be used for jackets, shoes and purses? Medium weight or upholstery leather is easy to craft since it doesn't fray or crinkle. These leather earrings are quick, versatile and easy to make. You can even recycle those old purses or jackets that have damage since you really only need small amounts of good leather. I used 4" square leather samples and had plenty left over to make more earrings. Supplies: Leather Leather punch (I bought mine at Michaels Craft store for around $10 but you can also get the from home stores like Home Depot or Lowes) Sharp scissors 2-Large Jump Rings 2-Earring wires Jewelry pliers Download the pattern below, print and cut out shapes. Cut 2-of each shape in the leather of your choice. I used 3 different types of leather, don't be afraid to mix it up. Pile one set of the three shapes on top of each other and carefully punch a whole on one of the ends. I punched the hole about a quarter of an inch away from the end using the sma...

Paper Towel Roll Flowers—Tutorial

Puppy puddle? Chips not strong enough to hold the salsa? Drippy pancake batter? I am constantly reaching for paper towels. Inevitably our recycling bin has it’s fair share of craft paper cylinders that make up the core of paper towels and toilet paper rolls. For years my idea of repurposing the tubes was to use them as an amplifier and howl in them, driving my dogs crazy and earning an eye roll from my husband. However, recently I was struck with an idea. The curve of the cardboard would lend itself well to making paper flowers, hence this tutorial was born. Sorry it is a little lengthy… Tools & Materials 1- paper towel roll core Scissors Button Paper glue Page of paper (can be recycled from an old book or magazine) Brown paper shopping bag 28 gauge wire (or wire that you can bend and manipulate that is heavy enough to hold up a paper flower) Wire cutters White craft paint (optional) Small paint brush (optional) Instructions Cut the paper towel roll lengthwise (fig. A). From the cu...

Leather Earring Pattern Update

In October I posted a tutorial to make leather earrings . Well for Christmas I revisited this craft and made a few other designs for a few people at my work. This is one of my favorite tutorials because they are so easy to make and the earrings are light and easy to wear. I liked the new designs so much I thought I would share the pattern for them. To view the full set of instructions on how to make these leather earrings, click here . To make one of the two pairs shown, download and print the updated pattern below (the bottom row are the new designs):