
Quick Felt Bow


When I was a kid my mom always put my hair in a pony tail with a ribbon or bow so to this day I love hair ornaments. And what better accessory for a high bun on your head then putting a big felt bow...it's like your a big present (although my husband would disagree and try to return me…or re-gift me)!

Need a big felt bow? Well here you go, it is super easy…

Supplies
Needle and thread
Scissors
Alligator hair clip
Felt
Printer for pattern


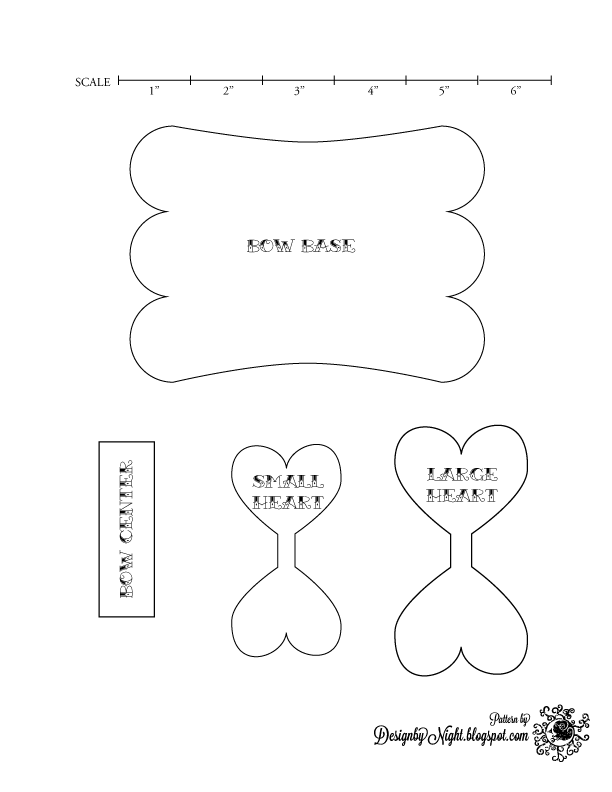
  1. Print out the pattern below. Using the pattern, cut out one of each piece in felt. I used three different colors. (Use the scale to make sure the print out is the correct size). 
  2. Thread your needle and run a gather stitch up the center or the bow base. Gather tightly and tie off.

  3. Take the large and small heart and place them on top of each other in the center of the bow base. Take the bow center and wrap it around the center of the bow. On the back side sew the ends of the bow center together.

  4. Slip the alligator clip onto the back, slipping it in between the bow center and the back of the bow.


Comments

Popular posts from this blog

Leather Earring Tutorial

Why should leather only be used for jackets, shoes and purses? Medium weight or upholstery leather is easy to craft since it doesn't fray or crinkle. These leather earrings are quick, versatile and easy to make. You can even recycle those old purses or jackets that have damage since you really only need small amounts of good leather. I used 4" square leather samples and had plenty left over to make more earrings. Supplies: Leather Leather punch (I bought mine at Michaels Craft store for around $10 but you can also get the from home stores like Home Depot or Lowes) Sharp scissors 2-Large Jump Rings 2-Earring wires Jewelry pliers Download the pattern below, print and cut out shapes. Cut 2-of each shape in the leather of your choice. I used 3 different types of leather, don't be afraid to mix it up. Pile one set of the three shapes on top of each other and carefully punch a whole on one of the ends. I punched the hole about a quarter of an inch away from the end using the sma...

Leather Earring Pattern Update

In October I posted a tutorial to make leather earrings . Well for Christmas I revisited this craft and made a few other designs for a few people at my work. This is one of my favorite tutorials because they are so easy to make and the earrings are light and easy to wear. I liked the new designs so much I thought I would share the pattern for them. To view the full set of instructions on how to make these leather earrings, click here . To make one of the two pairs shown, download and print the updated pattern below (the bottom row are the new designs):

Paper Towel Roll Flowers—Tutorial

Puppy puddle? Chips not strong enough to hold the salsa? Drippy pancake batter? I am constantly reaching for paper towels. Inevitably our recycling bin has it’s fair share of craft paper cylinders that make up the core of paper towels and toilet paper rolls. For years my idea of repurposing the tubes was to use them as an amplifier and howl in them, driving my dogs crazy and earning an eye roll from my husband. However, recently I was struck with an idea. The curve of the cardboard would lend itself well to making paper flowers, hence this tutorial was born. Sorry it is a little lengthy… Tools & Materials 1- paper towel roll core Scissors Button Paper glue Page of paper (can be recycled from an old book or magazine) Brown paper shopping bag 28 gauge wire (or wire that you can bend and manipulate that is heavy enough to hold up a paper flower) Wire cutters White craft paint (optional) Small paint brush (optional) Instructions Cut the paper towel roll lengthwise (fig. A). From the cu...