
Although I do not scrapbook, I am often drawn like a moth to a flame to the scrapbook isle in the craft store. I love all the miniature stickers, brads, stamped metal plates, colorful papers and above all anything glittery. Since I am a addicted to craft supplies, it is very hard to fight off the impulse to buy these things but usually I can turn away knowing that I probably will never design a scrapbooking page in my life.
Well about six months ago my addictive personality won (my name is Kolleen and I am a craft-o-holic). A tiny little glass jar of Fabric Fancies caught my eye. Fabric + flowers + glitter was too much temptation for me. I purchased this little jar of flower happiness and needless to say that jar has sat on my shelf for six months unopened…until this week.

Who said you need to use scrapbooking embellishments for scapbooking? No one did! I think the key word here is "embellshments." So I took that jar off the shelf, broke the seal and started working. These cute little pre-formed fabric flower pieces are perfect for turning into dainty flower hair pins.
This isn't exactly a tutorial, more of an idea starter. I am sure these flowers have dozens of uses that I haven't even considered and if anyone has any other ideas or photos of things they have made from them I would love to see and possibly post them!
Supplies:
Prima Marketing Got Flowers (I used Fabric Fancies)
Buttons
Needle and thread
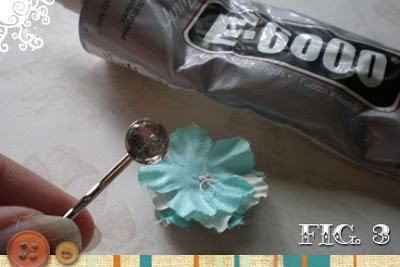
Bobby Pin with glue pad (you can purchase these on Etsy)
E-6000 Glue
- Pile up a grouping of flower embellishments on top of each other until you have something you like. It is up to you, use one or a dozen! Thread your needle and put a few stitches through the center to hold them in place.

- Sew a button or two to the center of the flower. I like to use two or three varying in size and color to add a little dimension.

- Take the E-6000 glue and place a dollop on the pad of the bobby pin. Glue the the back of the flower. Note: Make sure that you put enough glue on the pad so that when placed on the back of the flower there is a bead of glue all the way around the edge.


Comments
Post a Comment