
No Sew Felt Flower Pin


Need a last minute gift? Make this no sew felt flower brooch.

Supplies

1/8" yard of felt for flower
Pin backer
Hot glue gun
Scissors
Printer

  1. Print out the pattern below and cut out 14 petals, 1 pin cover and 1 base from the felt. (Use the scale to make sure the print out is the correct size).
  2. Take a dab of hot glue and place it at the bottom middle of the petal and fold down the right hand side. Place a second dab of glue in a similar area and fold the left side so it forms the shape below. Note the concave edge of the petal is the bottom. Repeat step with the remainder of the petals.


  3. Take four of the petals and glue them on the outside edge of the circle backer in a north, east, west, south manner (like the points of a compass).

  4. Take four more petals and glue them between the "compass" petals.


  5. Take the remaining five petals and glue them closer to the center of the backer, arranging them in a circle.

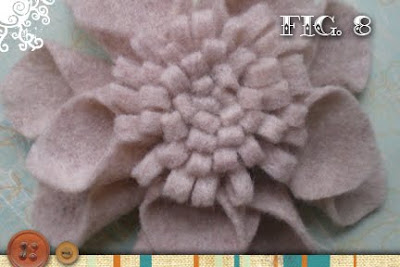
  6. Cut a strip of felt 12" long by 1" wide. Fold in half and place a few dabs of glue along the open long end of the strip to keep fold in place. Using scissors carefully snip "fringe" along the folded edge.

  7. Roll the fringe strip into a circle, using hot glue to tack it in place.

  8. Glue the fringe circle in the center of the petals.

  9. Turn over the flower and hot glue the pin to the center. Use the heart to cover up the pin back.


Comments

  1. That is so elegant! I always wondered how people stitched it all up, but apparently glue is the way to go. Thank you for sharing.

    ReplyDelete

Post a Comment

Popular posts from this blog

Leather Earring Tutorial

Why should leather only be used for jackets, shoes and purses? Medium weight or upholstery leather is easy to craft since it doesn't fray or crinkle. These leather earrings are quick, versatile and easy to make. You can even recycle those old purses or jackets that have damage since you really only need small amounts of good leather. I used 4" square leather samples and had plenty left over to make more earrings. Supplies: Leather Leather punch (I bought mine at Michaels Craft store for around $10 but you can also get the from home stores like Home Depot or Lowes) Sharp scissors 2-Large Jump Rings 2-Earring wires Jewelry pliers Download the pattern below, print and cut out shapes. Cut 2-of each shape in the leather of your choice. I used 3 different types of leather, don't be afraid to mix it up. Pile one set of the three shapes on top of each other and carefully punch a whole on one of the ends. I punched the hole about a quarter of an inch away from the end using the sma

Leather Earring Pattern Update

In October I posted a tutorial to make leather earrings . Well for Christmas I revisited this craft and made a few other designs for a few people at my work. This is one of my favorite tutorials because they are so easy to make and the earrings are light and easy to wear. I liked the new designs so much I thought I would share the pattern for them. To view the full set of instructions on how to make these leather earrings, click here . To make one of the two pairs shown, download and print the updated pattern below (the bottom row are the new designs):

Washer Necklace Tutorial

Every time I buy furniture that requires assembly I always left over hardware. I take this hardware and put it in a jar thinking that one day I will need that extra nut or bolt. Well today is that day! Below is a tutorial on how to take those extra washers and make them into a cute necklace. Supplies: Scissors X-acto knife or hole punch Pencil Small piece of scrapbooking paper (you can use the left over scraps for this project) Modge Podge (or something similar) Washer Aleene’s Paper Glaze 36” of ribbon or cord Use the washer to trace a circle on the paper, don’t forget to trace the inside circle as well. Using your scissors cut just inside of the traced line on the outer circle. Note: you want to cut inside of the line and not on it so it fits on the washer and does not overlap the edges. If the hole for your center is close to the same size of a hole punch, simply punch out the center circle. If not use the X-acto knife to cut out the center area. Modge Podge the paper to the washer